

איך אתם בוחרים את המתכון לפיו תכינו את המאכל שאתם מתכננים להכין? אצלי זה הולך באחת משלוש דרכים (אם אני לא מרגישה הרפתקנית מספיק כדי להמציא מתכון בעצמי) – או שאני רואה מאכל (בד"כ קינוח, אני חייבת להודות) שמישהו אחר הכין בבלוג אוכל או פורום מתכונים, והוא נראה כל כך טוב שאני לא יכולה להתאפק ומיד מכינה (מיד יכול לקחת עד חודשיים, לפעמים יותר). דרך שניה היא שבפורום מתכונים כלשהו, מאלו בהם אני גולשת, יש המלצה כל כך חמה על מתכון מסוים, שהוא נכנס ישר לרשימת ה"להכין בהקדם" שלי. ולפעמים אני פשוט נחושה בדעתי להכין משהו ספציפי, ואז מחפשת מתכונים אצל מקורות…
-
 לקרוא עוד
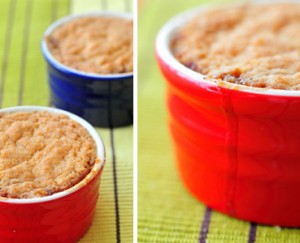
כבר יום לפני שפרסמתי את הפוסט הקודם החלטתי שהפוסט הזה יעסוק בראש השנה, שהרי כולנו (טוב נו, בואו נהיה מציאותיים, חלקנו הלא גדול) מחפשים בקדחתנות קינוח מנצח, שיהווה סיום נפלא לארוחת החג וישאיר את האורחים עם טעם של עוד. מוחי עבד שעות נוספות, כי רציתי להביא משהו שונה, מרענן, לא…
-
 לקרוא עוד
כן, חברים, הודעה שאותי אישית ממש מרגשת! החל מהיום יתחיל להתפרסם טור שבועי שאני כותבת בעכבר העיר און-ליין, במדור האוכל. למעשה כל פוסט שאני אכתוב בבלוג יעלה גם כטור בעכבר העיר, אז שיהיה בהצלחה ומקווה שתאהבו. אתם מוזמנים לקרוא את הטור הראשון.
-
 לקרוא עוד
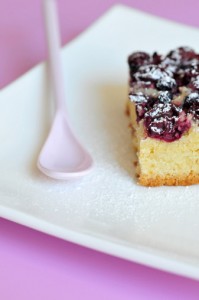
לכל משפחה רומנית שאני מכירה יש את המתכון המנצח לעוגת דובדבנים קיצית ומרעננת. זו אולי העוגה שהייתה הכי אהובה עלי כשהייתי ילדה, ברומניה, וסבתא שלי הייתה מכינה אותה פשוט מושלמת. הבעיה היא שכל מתכוניה של סבתא אבדו כשהיא הלכה לעולמה, הרבה לפני שהתחלתי להתעניין באפיה. שנים רבות פינטזתי על הטעם של…
-
 לקרוא עוד
סבתא של אבי התארחה אצלנו לארוחת ערב בשבוע שעבר. זו הייתה הפעם הראשונה שלה בדירה ה(כבר לא כל כך)חדשה שלנו. סבתא של אבי היא בן אדם שמעריך אוכל מאוד. לא כל כך לאכול אותו כמו לדאוג שכל האנשים שהיא אוהבת ודואגת להם אוכלים כמו שצריך. כך למשל, כשאבי ואני הודענו…