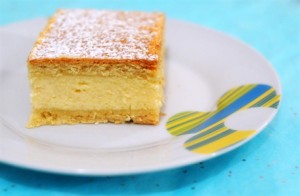
Archive for October, 2008

Signs of autumn - part one

In other countries there are the falling leaves that fill the pavements with a wonderful variety of colors, and tell everyone that autumn is here. In Israel there are other signs, the first of them I run into each year, is a sign for me that the summer heat is finally behind us. Sometimes it’s the first rain, that makes me notice that seasons have changed, other times it’s when I wake up in the chilly early morning hours, looking for my blanket. But above all those, there is one thing, that when you see it filling up the stores, you no longer have any doubt about it - that would be the “Krembo” (which means “cream inside”). The Krembo is made of a cookie base, on top of it there is a vanilla flavored egg-whites foam, and all this is coated with a layer of chocolate. There are other variations for the filling besides vanilla, the most popular among them being mocha.

Krembo

There are quite a few Krembo recipes all over the net and then some more in cookbooks, but none of them tempts me more than this original one. Yes, the store bought ones, wrapped with a thin layer of aluminium foil, the same one that a single taste from it fills your mouth with a tender silky cloud of goodness. Personally I prefer my Krembo vanilla flavored, but here in Israel, debates can go on and on about which is the best flavor - vanilla or mocha.

Krembo

Somewhere along the way I found out that the Krembo’s filling is made out of unbaked egg-white foam. The disaster! I immediately stopped eating them, and haven’t for a really long time. Luckily I became interested in the pastry world a while back, it was then that I discovered that the egg-whites are being heated before beating them, to a temperature that kills most bacterias that can potentially reside in them. This revelation made me better my ways again, and so Krembo reappeared in my menu occasionally.

Krembo

So, in honor of the most welcome autumn, here is a Krembo recipe, that is very close to the original one. I made the cookie base out of crashed petit-beurre biscuits, which I mixed with melted butter and with a little orange juice. They turned out yummy, with a delightful orange aroma. For the filling, I followed a recipe published by “Feldman”, a company that produces Krembo, and it turned out exactly like the original one. Finally, I also used Feldman’s recipe for the chocolate coating, although it turned out way too thick, so I diluted it with some oil. It turned out softer than the store bought one, but far better, because of the use of a good quality chocolate.

Krembo

Some notes and tips about the Krembo:

* I made the base cookies too small, and so they weren’t able to hold the right amount of filling. I made them about 4 cm in diameter, and I recommend making them about 6-8 cm length diameter.

* The best way to fill the cookies is to pipe the filling upon them. It’s quite easy, not to worry. Just hold the piping bag straight above the center of the cookie, and press it until the whole cookie’s base fills up. Then slightly lift up your hand and pipe another layer, and so on, until there is enough filling on the cookie.
Not in a piping mood? Simply take a spoonful of filling and place it on top of the cookie. Then use the spoon to neatly arrange the filling.

Krembo

* How do we coat the Krembos? By simply dipping them inside the chocolate mixture.

Krembo / Inspired by a recipe by “Feldman” company
For 40 small Krembos or 30 medium ones

Ingredients:
For the cookies:
170 gr petit-beurre biscuits
100 gr butter, melted
2-3 Tbsp orange juice

For the filling:
5 egg-whites
1 cup sugar
1 Tbsp gelatin powder
3 Tbsp water
1 tsp vanilla extract

For the coating:
300 gr bittersweet chocolate
100 gr butter
Vegetable oil, for diluting the mixture

Directions:
1. Prepare the cookies: Preheat the oven to 350F (180C).
2. Crash the biscuits in a food processor. Add the melted butter and mix until crumbly and moist. Add in 2 Tbsp of orange juice and mix until homogenized. Then check if the dough is now firm enough in order to take a small bit and make a sphere out of it that will hold its shape. If not, add another Tbsp of juice, otherwise skip it.
3. Roll out the dough, and cut cookies from it, using a cup or a round cookie cutter.
4. Place the cookies on a pan lined with baking sheet, and bake for about 12 minutes, or until golden.
5. Meanwhile prepare the filling: In a double boiler heat together egg-whites and sugar while stirring, until most of the sugar melts (60C temperature, if you have a sugar thermometer). Remove from heat.
6. Place the gelatin in a small bowl, along with the water. Let stand for 15 minutes. Place the bowl in the microwave for 30 seconds, and then stir the mixture. Beat the egg whites mixture and add the gelatin and vanilla extract to it. Keep beating the whites until the mixture cools down and the foam is stable and stiff (stiff peaks).
7. Pipe the filling on top of each cookie (see tips). Freeze the uncoated Krembos until you finish preparing the coating.
8. Prepare the coating: Melt together the chocolate and the butter. If you’re doing it in the microwave, make sure to do it in 30 seconds intervals, in order to not burn the chocolate. Let the mixture cool for 15 minutes. Now is the time to dilute the mixture, by adding in some oil. Add in the vegetable oil, tablespoon by tablespoon, until the coating is thin enough to allow us to dip the semi-frozen Krembos in it. Dip each Krembo in the coating, and place to dry on a baking sheet. Keep them in the refrigerator, and take them out a few minutes before serving.


My dear Romania!

Like many other Israelis, we also traveled abroad during this long (and very welcome) holiday season. Only that half of the reasons that made us go were bureaucratic (to issue my Romanian passport), the other purpose was to show Avi where I grew up, and for me to take a trip there, after a long time that I haven’t been. The previous time I’ve been there was in 2001, and the feelings I remained with were ambivalent. I remembered a city full of unfinished buildings that seemed like buildings’ ghosts, I remembered poverty, and I also remembered gloomy people all over. Other parts of the country, mostly the mountain parts, I remembered as so very beautiful and with very clean air. And finally I remembered all the great Romanian food, that I love so much - Supa de Perisoare (a slightly sour meat ball soup) or Cordon Bleu (sort of a schnitzel filled with melting cheese in the middle), or Cascaval Pane (fried Caciocavallo cheese) or Papanasi (wonderful Romanian doughnuts, served with sour cream and jam - divine!).

Cozonac (Romanian yeast cake, filled with nuts, bought from Real store in Brasov, self-production)

Before going there I told Avi that he’s gonna taste one of the world’s best kitchens. He really took my word for it, loving my Mom’s food so much, part of it traditional Romanian. When we got there we realized that most of the dishes I told him about contained pork meat, which Avi doesn’t eat… Avi ended up giving Romania “The Schnitzel Country” title, and we indeed ate there some great schnitzels, about one of them I’ll tell you in a future post.
Every trip of ours, deliberately or not, eventually turns out being mostly about food. And of course - so did this one. So those of you who plan on taking a trip there, here are the things, the way we see them.

At the bread market, a guy from the Ardeal area, preparing meet for roasting

The first thing I looked for were traditional Romanian restaurants. Actually, most restaurants there are traditional Romanian, except a few ethnic restaurants - we saw 2 Italians and 1 Chinese. A great traditional restaurant we’ve been to several times was “La Mama” (meaning “At Mom’s”), it’s a chain and has several restaurants in Bucharest, and everything we ate there was great. Especially recommended is their wholemeal bread (in the photo below), a wonderful meat balls soup, and an awesome schnitzel topped with corn flakes instead of bread crumbs. You will see mostly locals when you go there, they really love it since the portions are generous and the prices - reasonable.

The bread at “La Mama”

Another restaurant that I couldn’t wait to get there already was “Carul cu Bere“, a restaurant located in a beautiful gothic building, and that is open for 129 years. I remembered it as a very good restaurant from when I was little. We actually found there a great Romanian eggplant salad and an oh so tasty mamaliga dish, served with cream, yogurt and chees (it was the second time Avi tried to taste and like mamaliga. The tasting part went ok, but he failed to like it, again…). Other than that, the rest of the dishes were pretty mediocre. But I think what dissapointed me most in this trip was to discover that I no longer like the Romanian kebab. I tasted it twice, and it seemed too salty in both.

A great beef lasagna we ate at the “Lombardi” restaurant in Brasov

After fulfilling my hunger to traditional Romanian food, I started wondering where does the pastry world stand in Romania. When we left Romania, in 1989, there really wasn’t much of anything, but the pastry shops there were very good and updated to the current world’s pastry trends. I was dissapointed to discover that the pastry shops there, most of them anyway, are still stuck in the 80s’. One great chain we’ve found there though is called “French Bakery”. We ate a perfect butter croissant and a wonderfully fluffy and rich chocolate chips muffin.

The French Bakery

2 Recommendations we have regarding street food are the “Fornetti” chain and the little windows behind them stands a woman selling delightful Romanian doughnuts. On our first day we began seeing a lot of little Fornetti shops, a small line of people standing outside of each one. We didn’t get the fuss, but decided to try it, thinking that if it makes so many people happy, it can’t be that bad. We found there the most wonderful cheese filled puff pastry we’ve ever tasted (better even than the best burekas I’ve eaten in Israel), although there are various fillings, even sweet ones, all of them great!
The doughnut shops I knew from when I lived there back then, their divine taste hasn’t changed, just many various filling options have been added.

Fornetti

Coffee-wise Romania was a bit dissapointing. In other European countries such as Spain, France and Italy, every single espresso we drank was marvelous. In Romania we had a wonderul espresso on our second day there, at “Cafe Geisha”, a small coffee shop designed in a japanese style. We’ve tried in vain to recreate the success again.

Coffee

I almost didn’t see any ice-cream shops in Romania. In the beautiful old city of Brasov though, I ate a wonderful ice-cream near the black church, a little over-priced but great.

Avi and me in Bucharest

We spent our last day there at Anca’s house. Anca is a very good friend of my Mom. While drinking our morning coffee we saw on TV a live broadcast from a bread market held in a park, not far from where we were. Of course we rushed over there! A lot of stands were arranged all over the park, selling bread and many related products. There was one stand where a lot of people stood in line for. Obviously I joined the line, thinking that the best bread is right there. Was I right! After a short period of about 5 minutes, and 4 RON (the Romanian coin) later, I had a wonderful bread in my hands!

At the bread market

At the bread market

At the bread market

At the bread market

You can find more photos from our trip on Avi’s blog. He wrote one post about street photography there, and there are 1 or 2 more to come.

In Romania we ate our first Kiortosh. How wonderful!

Yesterday I started my patisserie course! I’m so excited, and it was so much fun, eventhough the whole day was theory only. Next time we’ll start doing the real things! I never imagined a class schedule can be so much fun!

Romanian Cheese Cake

And for dessert, I’ll leave you with a traditional Romanian cheese cake. The cake is very easy to make, doesn’t require a mixer or food processor, you can make all of it with just a wooden spoon. I made it for our good friends - Guy and Lisa, that came to visit.

Romanian Cheese Cake

Romanian Cheese Cake / Recipe from a Romanian recipes site
For a 20X30 cm rectangular pan

Ingredients:
For the dough:

7 Tbsp milk
7 Tbsp vegetable oil
6 Tbsp sugar
1 egg
1 flat tsp baking soda
350 gr (2.5 cups) all-purpose flour

For the filling:
500 gr ricotta cheese
2 eggs
200 gr powdered sugar
80 gr butter
2 flat Tbsp semolina
20 gr vanillated sugar (or 2 tsp vanilla extract)
grated zest of 1 lemon
100 gr light raisins (optional)

Directions:
1. Prepare the dough: in a small saucepan heat milk, oil and sugar. When it starts to boil, remove from heat and let cool until just warm.
2. Move the mixture into a bowl, and add the egg, baking soda and the flour. Mix until a dough is formed.
3. Divide the dough into 2 parts. Roll out both of them on a floured surface into a rectangle of the pan’s size. Don’t worry, the dough is easy to work with.
4. Place one of the dough parts on the bottom of a pan lined with a baking sheet.
5. Preheat the oven to 350F (180C).
6. Prepare the filling: Melt the butter and cool it until just warm.
7. Add in all the rest of the filling’s ingredients, and mix until a homogenic mixture is formed.
8. Pour the filling onto the dough in the pan, and spread evenly.
9. Using a fork, make holes on the other half of the dough, then place it on top of the filling.
10. Bake for about 35 minutes, or until the top part turns golden.
11. Cool, powder with powdered sugar before serving.


Chocolatey secrets

Chocolate Tart 

When people ask me what I love to bake most (or eat, it’s the same in this case), the answer is real simple - tarts! Desserts with a short crust base and a filling, any filling really, from pastry cream topped with fresh fruit, through chocolate or banana creamy fillings and even the simplest ones (a few weeks ago I’ve even made pear and ginger jam filled tartlets - wonderful!) can make me truly happy.

Melting chocolate and butter

This time I chose a recipe by Carine Goren, a very talented Israeli pastry chef, whom I’ve mentioned at least once before. “Sweet Secrets”, a great cookbook she published a few years back, brought baking to the people. I mean this is the first book I’ve seen until then that was perfect in every way - its beautiful design, the stunning and mouth-watering photos it was rich with (I wonder how come not all the books today come out with such wonderful photography! For me it’s basics in a cookbook), and the most important thing - the clarity and simplicity with which all the recipes were written. You could really tell that’s she truly wants everybody to succeed in making her recipes. And succeed we did, I think that she’s the most praised book writer in Israel in the sense of the recipes’ quality.

Chocolate Tart

And so is this tart. I haven’t yet met the persons that didn’t LOVE this tart and enjoyed every second of its first bite.  Using a good quality chocolate (I use Callebaut with 53% cocoa solids) will make the experience even greater.
I really enjoy giving sweet gifts to my friends, and this tart was made for Neta, a very good friend of ours, when she gave birth to little Noa. She really needed this sweet comfort after a long and not so easy childbirth.

Chocolate Tart

Chocolate Tart

Some notes and tips about this tart:

* The 2 remaining egg whites can be kept for a later use. Put them in a cup, cover with plastic wrap, write how many whites are in there (these things tend to be forgotten) and today’s date, and freeze them. They are kept great for 3-4 months, longer than that I haven’t tried.

Egg whites

* Short crust is not a great delight to roll out, it tends to stick to the surface it’s on, if not carefully floured, and too much flour doesn’t do it good as well. You have to options here:
1. The pretty one - roll it out. The method I find least painful is between two plastic wrap sheets, and the the rolling out part and moving it to the pan part get a lot easier.
2. The less pretty - use your hands. You can skip the rolling part and use your hands to place crust in the pan. Messier and less pretty, but it works. I use option 1 most of the times, and turn to option 2 when I feel really lazy.

chocolatetartcarinegoren18.jpg

chocolatetartcarinegoren12.jpg

* The crust’s margins are an important source of the tart’s beauty, in my eyes. So pay attention to them - and make sure that they are even throughout the whole tart, and make them quite thick (that also depends on the thickness of the crust you rolled out). If you need a little more dough for a corner there, look carfully and you’ll be able to find another corner to pinch from.

chocolatetartcarinegoren15.jpg

* Short crusts are sometimes baked apart from the filling - fully or partially, and in that case the filling is added to the crust and they are baked together for some more time. This process is called “blind baking“.

* Have you ever blind baked a crust and the base puffed up or the margins simply crashed into the bottom of the crust? 3 simple steps to solve these problems:
1. Make holes with a fork on the crust, after moving it to the pan.
2. Right after that place the pan with the crust in it in the freezer for 10 minutes.
3. Before baking, place a baking sheet on top of the dough and scatter “baking weights” on it - you can use relatively heavy legumes (like beans or chickpeas). The weights serve a double purpose here - they also press the crust down and prevent it from inflating, and also push the margins aside and prevent them from falling. See the picture below to have a feeling of how dense should the weights be.

chocolatetartcarinegoren14.jpg

chocolatetartcarinegoren16.jpg

* The tips about short crust I’ve given in my previous post are also valid here, so take a look.

Chocolate Tart / Carine Goren
For a 10 inch (26 cm) tart pan + 1 tartlet

Ingredients:
For the crust:
300 gr (2 packed cups) flour
200 gr butter, soft
100 gr powdered sugar
1 egg
10 gr vanillated sugar (can be replaced with 1 tsp of vanilla essence)

For the filling:
250 gr bitersweet chocolate
150 gr butter
2 eggs
2 egg yolks
50 gr (1/4 cup) sugar
a pinch of salt

Make the crust:
1. Process butter and sugar in the mixer until creamy.
2. Add in the egg and 1/4 amount of the flour, until smooth. Add in the rest of the flour and process only until a dough is formed (careful, too lenghty processing will harm the texture). Gather the dough with your hands, form a flat circle, wrap it with plastic wrap and chill for 2 hours, until the dough is cold and stiff.
3. Roll out the dough (see tips) to a circle a bit bigger than the pan’s size. It’s supposed to be about 0.5 cm thick. Place the dough in the pan and press the dough so it will fit perfectly in the pan. Here’s the place to give those margins some TLC, they’ll pay it back bigtime.
4. Make holes in the dough using a fork (see tips) and then freeze it for 10 minutes.
5. Take out of the freezer and scatter the baking weights (see tips).
6. Bake for about 15 minutes in a 350F(180C) preheated oven, until the margins begin to become golden. Remove the weights and allow the bottom to bake as well, until it becomes slightly golden.

Meanwhile, prepare the filling:
1. Melt together chocolate, butter and salt. If you’re doing it in the microwave, make sure to do it in 30 seconds intervals, and stir between each one, in order to prevent the chocolate from burning.
2. In the mixer beat together eggs, egg yolks and sugar for 5 minutes, at high speed., until light in color and fluffy in texture.
3. Gently fold the egg mixture into the chocolate mixture, until well blended. Pour over the baked crust. Bake together for about 20 minutes, or until the filling slightly cracks, is bearly stable and soft to touch.


Alfajores

As I’ve told you before, last Purim I’ve played the cookie game, on an Israeli food forum I’m a member of. There are many talented members on that forum, but one  of the most talented among them is Sivan, the girl who sent me the cookies on that game. The cookies were so great, that they barely lasted a week, and we’re talking lots of cookies here.

Alfajores

One of the cookies we loved most in that package were these alfajores, maybe the best I’ve ever eaten. Avi says I’m declaring that too often about food, but in this case, he definitely agreed with me.

Alfajores

For a few months now, a good friend I work with, told me about her cookie fobia. “No cookies I ever make turn out well”, she used to tell me. So a few weeks ago I invited her over for a cookie baking evening, to get rid of her fobia. And we made these awesome alfajores! The recipe was very accurate, as all Sivan’s recipes, and it allowed us to reach the same great cookies as the ones she sent me.

Alfajores

Do you also have a cookie or other pastry fobia? First of all, try these cookies. They are real easy to make and to get great results with. And second, remember that many times the reason of a failed dish is a not accurate enough recipe, or one that is lacking important information, and there’s also the reason of not following the recipe closely enough. The pastry world, as you probably know, requires a great deal of accuracy. So go ahead, give your fobia subject one more try, this time with a recipe from a reliable source, and try to follow it exactly as it’s written.

Alfajores

Some notes and tips about these cookies:

* This recipe calls for a mixer. Don’t have one? No worries, you can also do it manually. Use cold butter instead of softened one, and cut it into cubes. Place all the ingredients except the egg yolks and vanilla extract in a bowl, and crumble the mixture by rubbing it in your palms. The final mixture should be crumbly, and resemble to couscous crumbles, only a bit bigger. Then add in the yolks and the vanilla extract, and knead it only until a uniform dough is created.

* The secret of a good short crust is processing it as little as you can since the flour comes in contact with liquids, so make sure you pay attention to it.

* Not that much into dulce de leche? You can fill these cookies also with Nutella or with a chocolate spread or halva spread, and even with dates spread.

* If the spread you chose is too firm to work with, warm it for several seconds in the microwave.

Alfajores 

Alfajores / Sivan
For about 25 alfajores

Ingredients:
150 gr butter, soft
100 gr powdered sugar
1 tsp vanilla extract
150 gr cornstarch
150 gr flour
5 gr baking powder
4 egg yolks

For filling and rolling:
A jar of dulce de leche
Coconut flakes

Directions:
1. Cream butter and powdered sugar in the mixer (no mixer? see tips), add in the yolks one be one and then the vanilla extract.
2. In a separate bowl, mix the cornstarch, flour and baing powder, and add them into the butter mixture. Process only until a dough is formed, and not longer than that. Chill in the refrigerator for 2 hours.
3. Preheat the oven to 350F (180C).
4. Roll the dough 0.5 cm thick, and cut cookies out of it using a glass or cookie cutters.
5. Bake for about 10 mins, or until the cookies just begin to change their color, but are still relatively light.
6. Pipe (or use teaspoonfulls) dulce de leche on top of one cookie, close it with a “clean” cookie and squeeze a bit, for the filling to show a little, so that it will easily stick to the coconut. Roll the cookies in coconut flakes.