
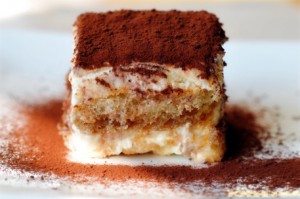
הרבה מהמאכלים ומהמשקאות הכי אהובים עלי הם טעמים שרכשתי עם הזמן. ניקח למשל יין, שכיום שתייתו היא ריטואל שאני כל כך נהנית ממנו, גרם לי ללא מעט עיוותי פרצוף בגילאים צעירים יותר. וכך גם טירמיסו. הבישקוטים הטבולים בקפה, (משקה שגם ממנו סלדתי בעבר) הטעם האלכוהולי המורגש מדי לפעמים, קינוחים על בסיס קרם שגם אותם לא ממש אהבתי בעבר – לא הבנתי על מה כל המהומה. כיום זה אחד הקינוחים האהובים עלי. אני חושבת שזה התחיל בטיול שלנו לטוסקנה לפני שנתיים, כשאכלנו קינוח על בסיס זביונה שהיה לא פחות ממופלא. זביונה הוא קינוח איטלקי קלאסי, מרקמו קרמי וסמיך והוא מורכב מחלמוני ביצים (מחוממים לטמפ'…
-
 לקרוא עוד
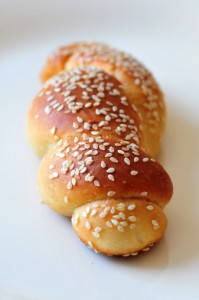
יש משהו קסום בעיני באוירה של שישי אחרי הצהריים. המולת הרחוב הולכת ונעלמת, מחליפים אותה ענני שקט נעימים ורכים, שהולכים ויורדים על העיר, ניחוחות בישול לקראת ארוחת הערב המשפחתית ממלאים את האויר. אותי אישית כל אלה מרגשים מאוד, ולכן גם אחד מזמני האפייה האהובים עלי זה בדיוק הזמן הזה בשבוע, וכך…
-
 לקרוא עוד
פשטידות ואני לא חברות טובות. אני מתעלמת מקיומן והן מתעלמות מקיומי, וזה בסיס יחסים נהדר בשבילי, במקרה הזה. כי, אתם מבינים, אדם שאוהב בצקים ברמה שאני אוהבת אותם, פשוט לא יכול להנות מפשטידה, כשהוא יודע כמה היא תהיה הרבה יותר טובה בתור מלית לקיש. קיש עם בסיס איתן אך עם…
-
 לקרוא עוד
בכל שנה כשהחורף מתקרב, אבי מכריז בשמחה "עונת המרקים מתחילה, מאמי!", ושנינו ממש שמחים ובטוחים שבמהלך כל החורף הקרוב אנחנו נכין עשרות מרקים, אם לא מאות. כמה חודשים מאוחר יותר המציאות העגומה טופחת על פנינו, ובסוף החורף אנחנו מוצאים את עצמנו תוהים איך זה שלא הכנו יותר מרקים. השיא היה לפני שנה, בתחילת…